So far I have done the following:
SEWING
- Finish baby quilt I started 2 years ago- Not even touched it.
- Finish quilt that I am making with fabric I have won - close to finishing. Maybe now the machine and the table are set up properly I might get a chance to finish. Hmm that may be wishful thinking
- Finish Christmas table runner I am hand sewing with small hexagons- I have made a huge dent in this but the fabric is dark and I really need to get myself some glasses. Things up close are just all blurry now.
- Start and finish 6 Christmas gifts - fabric is coming but not sure what I am making yet. - This list kind of grew. Without giving it away I have finished at least 1 sewn item and started on others. I still have two more to start on. I have also made around 10 other items that aren't sewn.
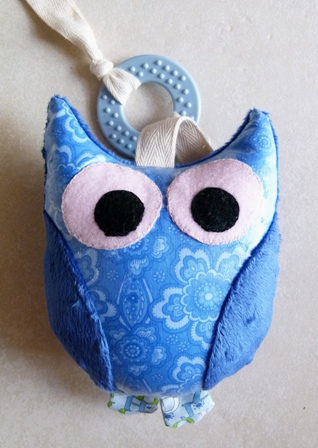
- Finish pram toys - YES!!!! LOL actually only one ended up being a pram toy.
This is all the toys. Each one has a rattle or a bell inside. The owl is the one that can be attached to the pram. The balls are hexagons that I hand stitched together. They are attache to teething rings as well.
I made up the pattern for them all.


ETSY
Currently not happening. I have made two sales (one on line and one off line). I need to revise my prices and postage but that means time to sit down and do it.
BLYTHE
Also not currently happening. Will get back to that in the new year.
PHOTOGRAPHY
- Finish editing my Tassie holiday shots- Nope barely had a chance and I have take other photos since then that need sorting as well.
- Hopefully make a photo calendar for my Aunts in the East- YES and it has been posted off. Had some lovely feedback on it.
- Book Flights- DONE
- Get necessary clearances - Police; working with kids etc- DONE
- Medical check up - Wasn't required.
- DON'T FORGET MY FUNDRAISING LINK ON THE SIDE OF MY BLOG. ;) - You still have time to donate. Remember it is for a good cause and it is tax deductible.
- Start and finish soooo many kits that I have (especially the Christmas ones). - Not a Chance.
- Make a fun album with some photos for a friend.- Hmm maybe for next year but not this year. Not sure if I have the time. Plus I want to write a story that goes with it and not sure what to write yet.
- Clean up the craft areas (yes they have multiplied) and sort them out so that I know where everything is!- Started on this then most of my time was taken away by organising the craft for the annual Christmas Production.
- Prepare 25 make and takes for a Card Christmas party in a week (plus cook cupcakes for it).YES, Done and Done! It was a great day.
- Make maternity leave card. YES! Not quite a card though.
Maternity leave wall hanging.
I made the teddy from Fimo that is sculpted around aluminium foil.


This is the card I made for the Christmas Party:
Whisper White card Stock
Northern Flurry Embossing Folder
Ornament Punch
Delightful Decorations - Joy ornament stamp.
I stamped the joy ornament stamp first in Versamark
Add white embossing powder and heat.
Once cool use a sponge to rub chosen colour into the areas not embossed.
(I used Crumb Cake)
Punch out using the ornament punch.
I have attached it to the card with Dimensionals
Twine was added to give the hanging effect.
I used the seam binding crumb cake ribbon for the bow and stuck it on with double sided tape.

These next two cards and box were the make and takes at my fundraiser.
Riding Hood Red card stock was used as main card.
Snow Swirled stamp set was used to add character to the main card.
(stamped in riding hood red ink)
I also sponged the edges to give a bit of depth.
Whisper White card stock embossed using the Textured Impressions embossing folder
Cut around the outer edge of the embossing.
Sponge the top of the embossing with Shimmer paint
(I used Champagne Mist)
Place embossed card on red card.
Stamp the oval from Joyous Celebrations Stamp set onto another whisper white card piece using Riding Hood Red ink.
In Garden Green Ink I stamped the little leafy stamp from Joyous Celebrations.
Punch out using the Extra Large Oval punch
On a separate piece of whisper white stamp the bow from Joyous Celebrations in Riding Hood Red and cut it out.
The bow is small so I used only half a Dimensional to attach it to the top of the oval.
I added a Rhinestone to fancy it up.
Again on a separate piece of whisper white stamp out the greeting and cut it out.
Place the greeting onto some Garden Green card stock and cut out a ribbon effect.
Sponge around the outside in Garden Green ink.
Tape the greeting to the oval.
Attach the oval to the center of the embossed card using dimensionals.
(Textured Impressions and Joyous Celebrations are only available for a short time in the mini catalogue - available till the end of Jan '13)

Totally in love with the new Glimmer paper. I have used silver here.
Main card is Midnight Muse.
The white card stock is Glossy White (which no longer appears to be for sale in the Catalogue .. Nooooo!)
Down one side of the white I used the scallop border punch.
Using one of the Trees from the Evergreen Stamp set I stamped the card in Versamark (making sure it was off center).
Cover with white embossing powder and heat.
Down the scallop side of the card I used sticky notes (post its)to mask off an area that I wanted to stay white.
Using the following inks I then sponged all over the exposed white area: Midnight Muse, Tempting Turquoise, Marina Mist
(I love this technique as it doesn't colour the heat embossing).
Peal off the sticky notes.
Cut two strips from the gorgeous new Glimmer paper.
One wide one for the side and a smaller one for the strip
(HINT: I put double sided tape on the card first and then trimmed it to the size of the tape in order to get the strip).
I joined the white card and the wide silver strip together first before adding them to the main card.
The small strip runs flush to your sponging.
Punch out a star (from Merry Mini's punch pack) and attach with a dimensional.
The Christmas greeting is from the stamp set More Merry messages and done in Midnight Muse Ink.
(Evergreen Stamp set and Punch Pack Merry Mini's are only available for a short time in the mini catalogue - available till the end of Jan '13)

Box was cut using Night of Navy card stock and the Fancy Favor Bigz XL die.
Whisper White Card stock was used to punch out a lacey border (punch no longer available).
I attached this by running double sided tape along the center and then rubbing glitter on the exposed areas of tape.
The Snowflakes are using the Bigz Die Snow Flurry, silver glimmer paper and glossy white that I sponged with Night of Navy ink.

Last but not least is Millicent's sewing lessons. She is the best student I have ever had. In her first session she was sewing circles! Remember she has not touched a sewing machine before.
The first lesson was basically how to use a machine. We ended up making three sized circle pin cushions, stuffing them and hand stitching closed. In the third lesson, we used embroidery thread to pull the edges in like a flower and then join the three in a tower. I am very proud of her, she has done a great job. Though she did say I had made it!! Hello I helped but most of the work was hers.

Just before the second lesson we went shopping. She had a simple dress in mind that she wanted to make and I decided that yes it was simple enough for her first one. We found the perfect pattern but it was out of stock so we chose another one. This pattern really should be done in knit fabric but there was no nice knit fabric so we went for cotton while crossing our fingers.
The second lesson was all about how to cut out a patter, reading what was on the pattern pieces, warp, weft and selvedges, and how to place so that you can save fabric. It was also a lot of guess work trying to figure out the pattern pieces required. The pattern we chose can be made multiple ways (at least 6 that I know of) and you have to figure out which pieces you need.
Here she is with her first pinned pattern piece.

Now she is cutting out very carefully.

Today was the third lesson. She was taught how to read the pattern instructions and that it is easier to decipher thanks to the pictures they have. She also learned how frustrating some patterns can be as they don't always tell you what is needed (ie the collar needed to be cut 4 times not twice and once in interfacing - this was not mentioned on the pattern piece). Zig zag stitch, and gathering has also been learned today as well as knowing when it is time to stop.
We had been going at it most of the day and managed to get a fair amount done before we stopped and finished the pin cushion.
Here she is full of concentration. Best student ever. Why were my kids in high school not this conscientious.

Well this has turned out to be a long post. In fact it has taken me a couple of hours. Darn thing better upload properly now.
Night all, I have to get up early, bath and trim the dog before her photo with Santa Clause. Yes you can take your pets to see Santa at the shop on a Sunday. :)


