Saturday 8 December 2012

To Do List Catch up.

These last few weeks I have been run off my feet.  I ran small Stampin' Up class fundraiser for my Cambodian Volun-tour; been visiting my gorgeous friend Sulea and her little baby (nicknamed Gizmo); started Millicent's sewing lessons; punched out thousands of little christmas trees, stars, snowflakes, stockings and mittens for a craft section at my church's annual Christmas production (yep that took forever); and made a nice dent in my to do list.

So far I have done the following:
 
SEWING
  1. Finish baby quilt I started 2 years ago- Not even touched it.
  2. Finish quilt that I am making with fabric I have won - close to finishing.  Maybe now the machine and the table are set up properly I might get a chance to finish.  Hmm that may be wishful thinking
  3. Finish Christmas table runner I am hand sewing with small hexagons- I have made a huge dent in this but the fabric is dark and I really need to get myself some glasses.  Things up close are just all blurry now.
  4. Start and finish 6 Christmas gifts - fabric is coming but not sure what I am making yet. - This list kind of grew.  Without giving it away I have finished at least 1 sewn item and started on others.  I still have two more to start on. I have also made around 10 other items that aren't sewn.
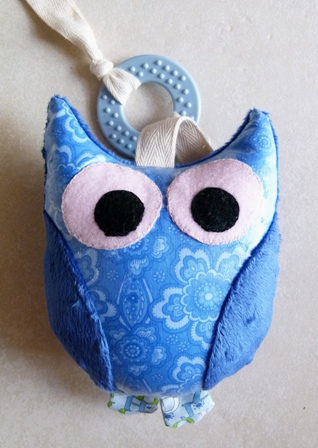
  5. Finish pram toys - YES!!!! LOL actually only one ended up being a pram toy.   
This is all the toys.  Each one has a rattle or a bell inside.  The owl is the one that can be attached to the pram.  The balls are hexagons that I hand stitched together.  They are attache to teething rings as well.  
I made up the pattern for them all.

ETSY
Currently not happening.  I have made two sales (one on line and one off line).  I need to revise my prices and postage but that means time to sit down and do it.
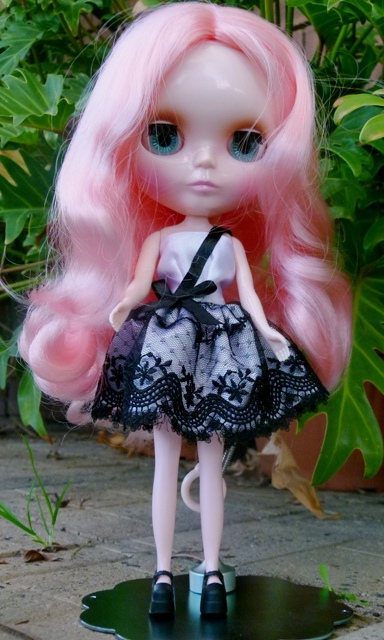
BLYTHE
Also not currently happening.  Will get back to that in the new year.

PHOTOGRAPHY

  1. Finish editing my Tassie holiday shots- Nope barely had a chance and I have take other photos since then that need sorting as well.
  2. Hopefully make a photo calendar for my Aunts in the East- YES and it has been posted off.  Had some lovely feedback on it.
CAMBODIA VOLUN-TOUR
  1. Book Flights- DONE
  2. Get necessary clearances - Police; working with kids etc- DONE
  3. Medical check up - Wasn't required.
  4. DON'T FORGET MY FUNDRAISING LINK ON THE SIDE OF MY BLOG.  ;) - You still have time to donate.  Remember it is for a good cause and it is tax deductible.
 CRAFT
  1. Start and finish soooo many kits that I have (especially the Christmas ones). - Not a Chance.
  2. Make a fun album with some photos for a friend.- Hmm maybe for next year but not this year.  Not sure if I have the time.  Plus I want to write a story that goes with it and not sure what to write yet.
  3. Clean up the craft areas (yes they have multiplied) and sort them out so that I know where everything is!- Started on this then most of my time was taken away by organising the craft for the annual Christmas Production.
  4. Prepare 25 make and takes for a Card Christmas party in a week (plus cook cupcakes for it).YES,  Done and Done!  It was a great day.
  5. Make maternity leave card. YES!  Not quite a card though. 

Maternity leave wall hanging.
I made the teddy from Fimo that is sculpted around aluminium foil.

 
 This is the card I made for the Christmas Party:
Whisper White card Stock
Northern Flurry Embossing Folder
Ornament Punch
Delightful Decorations - Joy ornament stamp.
I stamped the joy ornament stamp first in Versamark
Add white embossing powder and heat.
Once cool use a sponge to rub chosen colour into the areas not embossed.
(I used Crumb Cake)
Punch out using the ornament punch.
I have attached it to the card with Dimensionals
Twine was added to give the hanging effect.
I used the seam binding crumb cake ribbon for the bow and stuck it on with double sided tape.

 These next two cards and box were the make and takes at my fundraiser.

Riding Hood Red card stock was used as main card.
Snow Swirled stamp set was used to add character to the main card.
(stamped in riding hood red ink)
I also sponged the edges to give a bit of depth.
Whisper White card stock embossed using the Textured Impressions embossing folder
Cut around the outer edge of the embossing.
Sponge the top of the embossing with Shimmer paint
(I used Champagne Mist)
Place embossed card on red card.
 Stamp the oval from Joyous Celebrations Stamp set onto another whisper white card piece using Riding Hood Red ink.
In Garden Green Ink I stamped the little leafy stamp from Joyous Celebrations.
Punch out using the Extra Large Oval punch
On a separate piece of whisper white stamp the bow from Joyous Celebrations in Riding Hood Red and cut it out.
The bow is small so I used only half a Dimensional to attach it to the top of the oval.
I added a Rhinestone to fancy it up.
Again on a separate piece of whisper white stamp out the greeting and cut it out.
Place the greeting onto some Garden Green card stock and cut out a ribbon effect.
Sponge around the outside in Garden Green ink.
Tape the greeting to the oval.
Attach the oval to the center of the embossed card using dimensionals.
(Textured Impressions and Joyous Celebrations are only available for a short time in the mini catalogue - available till the end of Jan '13)

Totally in love with the new Glimmer paper.  I have used silver here.
Main card is Midnight Muse.
The white card stock is Glossy White (which no longer appears to be for sale in the Catalogue .. Nooooo!)
Down one side of the white I used the scallop border punch.
Using one of the Trees from the Evergreen Stamp set I stamped the card in Versamark (making sure it was off center).  
Cover with white embossing powder and heat.
Down the scallop side of the card I used sticky notes (post its)to mask off an area that I wanted to stay white.
Using the following inks I then sponged all over the exposed white area: Midnight Muse, Tempting Turquoise, Marina Mist
(I love this technique as it doesn't colour the heat embossing).
Peal off the sticky notes.
Cut two strips from the gorgeous new Glimmer paper.
One wide one for the side and a smaller one for the strip
(HINT: I put double sided tape on the card first and then trimmed it to the size of the tape in order to get the strip).
I joined the white card and the wide silver strip together first before adding them to the main card.
The small strip runs flush to your sponging.  
Punch out a star (from Merry Mini's punch pack) and attach with a dimensional.
The Christmas greeting is from the stamp set More Merry messages and done in Midnight Muse Ink.
(Evergreen Stamp set and Punch Pack Merry Mini's are only available for a short time in the mini catalogue - available till the end of Jan '13)

Box was cut using Night of Navy card stock and the Fancy Favor Bigz XL die.
Whisper White Card stock was used to punch out a lacey border (punch no longer available).
I attached this by running double sided tape along the center and then rubbing glitter on the exposed areas of tape.
The Snowflakes are using the Bigz Die Snow Flurry, silver glimmer paper and glossy white that I sponged with Night of Navy ink.

Last but not least is Millicent's sewing lessons.  She is the best student I have ever had.  In her first session she was sewing circles!  Remember she has not touched a sewing machine before. 

The first lesson was basically how to use a machine.  We ended up making three sized circle pin cushions, stuffing them and hand stitching closed.  In the third lesson, we used embroidery thread to pull the edges in like a flower and then join the three in a tower.  I am very proud of her, she has done a great job.  Though she did say I had made it!! Hello I helped but most of the work was hers.

 Just before the second lesson we went shopping.  She had a simple dress in mind that she wanted to make and I decided that yes it was simple enough for her first one.  We found the perfect pattern but it was out of stock so we chose another one.  This pattern really should be done in knit fabric but there was no nice knit fabric so we went for cotton while crossing our fingers. 

The second lesson was all about how to cut out a patter, reading what was on the pattern pieces, warp, weft and selvedges, and how to place so that you can save fabric.  It was also a lot of guess work trying to figure out the pattern pieces required.  The pattern we chose can be made multiple ways (at least 6 that I know of) and you have to figure out which pieces you need.

Here she is with her first pinned pattern piece.

 Now she is cutting out very carefully.

Today was the third lesson.  She was taught how to read the pattern instructions and that it is easier to decipher thanks to the pictures they have.  She also learned how frustrating some patterns can be as they don't always tell you what is needed (ie the collar needed to be cut 4 times not twice and once in interfacing - this was not mentioned on the pattern piece).  Zig zag stitch, and gathering has also been learned today as well as knowing when it is time to stop. 

We had been going at it most of the day and managed to get a fair amount done before we stopped and finished the pin cushion.

Here she is full of concentration.  Best student ever.  Why were my kids in high school not this conscientious. 

Well this has turned out to be a long post.  In fact it has taken me a couple of hours.  Darn thing better upload properly now.

Night all, I have to get up early, bath and trim the dog before her photo with Santa Clause.  Yes you can take your pets to see Santa at the shop on a Sunday.  :)

Thursday 22 November 2012

Spider Intelligence

Have you ever seen a Pomeranian malt for summer?  The under layer of fur is thick and fluffy so it comes off in chunks.  We have been finding little black chunks of Bo's fur every where.  Yes I needed to tell you this before I go into my story about an intelligent spider, which is beginning now.

I have an ice-cream container on the floor in my bedroom (don't ask).  Until a week ago it was empty.  A small spider (about the size of a thumb nail) took up residence in the container.  I remember wondering how on earth it was going to get something to eat in there. 

Every morning I would get up and see the little spider sitting in its favourite corner on the far side of the container.

About two days ago I noticed some of Bo's fluff sitting in the spiders favourite corner and he had moved to the centre, that is until last night.

Just before I went to bed I glanced in at my roomie.  I realised that the spider had not stayed in the container by choice but that it was trapped.  The sides were too slippery for it to cling to.  I then noticed that it was making a web and thought, oh ok it is fine, its not trapped. As I watched it cross it's web to hover in it's favourite corner above the fluff.

If I knew then what I know now I would have wished for one of those video cameras to record what it did all night.

You see it had been hatching an escape plan.  It needed the fluff to raise it up off the bottom of the container and start a web.  It would then pull the fluff up each successive web layer (I am only surmising here) until it had reached the top (which also happened to be the diagonally opposite corner).  With it's silken web strings attached to the fluff, it flung the fluff over the edge (like Rapunzel's hair) and made it's escape. 

This is what I woke up to this morning.  The corner where the light is reflecting on the inside of the container is where the fluff was when I went to bed.  So proud of my little spider. 

Thursday 13 September 2012

Too much

Someone stop the world please, I wanna get off!

Do you ever have those times when you realise that you have organised so much for yourself to make and do and not given yourself enough time in which to do it?  Dumb question really isn't it.

When I made the below list I thought that it would be moderate ... now I am just plain scared.

SEWING
  1. Finish baby quilt I started 2 years ago
  2. Finish quilt that I am making with fabric I have won\
  3. Finish Christmas table runner I am hand sewing with small hexagons
  4. Finish pram toys
  5. Start and finish 6 Christmas gifts - fabric is coming but not sure what I am making yet 
ETSY
  1. Finish "decoupage" pendants that I have on the go (about 20) and put on the store
  2. Create and add some of my doodle art
  3. Complete polymer clay dragon and pendant crystals
  4. Once I have a good variety of items ask friends to help promote my store and have a sale.
CRAFT
  1. Prepare 25 make and takes for a Card Christmas party in a week (plus cook cupcakes for it).
  2. Make maternity leave card
  3. Start and finish soooo many kits that I have (especially the Christmas ones).
  4. Make a fun album with some photos for a friend.
  5. Clean up the craft areas (yes they have multiplied) and sort them out so that I know where everything is!
BLYTHE
  1. Finish my Blythe doll.  I have the pattern and the fabric for her clothes now so I have no excuse ...
  2. Start on new Blythe dolls.  Yes I have bought two more that I want to customise.  The latest edition is below.
PHOTOGRAPHY
  1. Finish editing my Tassie holiday shots
  2. Hopefully make a photo calendar for my Aunts in the East
CAMBODIA VOLUN-TOUR
  1. Book Flights
  2. Get necessary clearances - Police; working with kids etc
  3. Medical check up
  4. DON'T FORGET MY FUNDRAISING LINK ON THE SIDE OF MY BLOG.  ;)

Here are some photos I have been promising for a while:

The new Blythe.  She is what is termed a Factory Doll.  No one really knows what that means but they are normally a mismatch of parts.  This one is well matched from scalp colour to hair and overall skin tone.  She has legit Takara stamps on her body so I know she is the real deal.  I have heard since though that these factory dolls may be put together from stolen parts.  Kind of puts me off getting them now for customising.  They cost pretty much the same amount as some of the cheaper ones anyway.  I did buy a  Simply Mango to customise but my mother said she was too nice as it is.  She is now in the display cupboard along with the other untouchables.

    I was very impressed that she came dressed.  Normally factory dolls are nude and I am sure she was advertised as such. I bought her because I loved her hair so I won't need to scalp her.

    One of the little boys mum looks after recently turned 1.  There was a little bubble machine that he loved.  It was also a windy day so bubbles went everywhere.  These next two photos were taken with me standing next to the machine and the wind blowing bubbles in mums direction.  Couldn't have planned either of them if I wanted to. 


     A week or so ago we all headed off for wave rock.  My cousin took his kids surfboard and was a bit disappointed he was the only one there, in the middle of no where, with a board.  :)  Here he is catching the wave.  He really did!  Look you can see the wake he made.  Good considering he has had no lessons.  I think he should have charged people because others asked to borrow it.


    Of course my intrepid mother had to give it ago.  Her balance isn't that good anymore so she swam to catch the wave.  The fact that she forgot her bathers didn't deter her.

    The sisters.  No their hair style was not planned to be similar and they didn't plan their wardrobe either.  Don't ask about the toys they are holding, that is another story.
     

    Last but not least is a photo that was taken in Tassie.  It is to not only show my short hair style but I also wanted to introduce you to my Aunty P and Mrs V.  Mrs V used to babysit me when mum and dad worked.  Aunty P was mums best friend.  Love them both dearly.


Tuesday 11 September 2012

Rethinking ...

Recently I purchased a natural amethyst point that didn't quite sit right.  I decided that a dragon holding onto it would look great.  Poor thing had his fingers squished and resurrected in the process quite a bit so don't look too closely hat his hands.  He refuses to let go as well and therefore I have named the piece "MY Amethyst" - yes with a capitol MY.  :)


Of course I could not take photos and not have fun with pixlr-o-matic.


In other creative news, I have almost finished the pram toys for S.  Been having fun with them.  I can't post pics here yet as she is back on FB and will see the link.  Will post once she has got them. 

Still have a quilt on the go.  This is for me so items for others and the arrival of my polymer clay have taken precedence.  I need to get some curved pins to pin the pieces together but they are hard to find.  Most likely I am googling incorrectly. 

I am super excited to start on some of the items I am making for Christmas though.  Still waiting on the fabric.  My mother found an old pattern for a floor cushion that is in the shape of a frog.  I don't mean a 2D flat one either.   It is a 3D one.  I will be making this for my cousins little boy when they move here (that is in two weeks).  OMG That is in 2 weeks!!!! 

I need a super shed for my crafts.  That way I can have paints in one area, clay in another, jewellery, sewing, and so in at different stations.  That way I won't get clay squished in fabric when I am multi-tasking.

This should be Totally Tessa Tuesday, and although she is full of life and stories I have decided that allocating a day a week for different things is not working for me. I have too much on the go and can't always post when I want to. I also found that I had things I wanted to post but it wasn't the day for it. Therefore I have rethunk my rethinking of my blog and have decided to continue as I always did.

Monday 3 September 2012

What I am making Monday

So much to make and so little time in which to do it.  I have so much on the go right now that really needs my attention but I seem drawn to polymer clay.  I should be sewing and finishing the pram toys I promised S I would do for her baby.  They are cut out at least and a couple are stitched together.

The polymer clay started up because I wanted to make a maternity leave card for S to be signed by those at work but I wanted to make something that was a little different.  I made the one pictured below for a friend years ago now and she loved it so much that she framed it.


I was going to do something similar again and thought I would make the bear out of polymer clay.  I decided to combine the idea with the frame itself.  Instead of writing inside the card, people would write around the matt board that would border the main picture. 

My task now was to find a frame that had a matt board big enough for 30 plus people to sign but also not be too large.  I found what I was looking for in Thingz.  The price had been knocked down twice and I managed to get a nice frame for $13.

Long story short, I decided against the card above.  I suppose it was because I had been there, done that.  I remembered a cross stitch of a baby asleep on a flower and decided to do that but with a bear. 

The bear is actually shaped with tin foil first and then a thin layer of polymer clay has been put on top.  That way the ears don't get burnt while the rest of it is cooking.


S will be getting this on Thursday. It is going to be sad to see her go but luckily for me she lives close by. This means lots of baby hugs.

Speaking of baby hugs, my cousin in moving here.  She is pregnant as well.  It is going to be so nice to have babies to hug again, especially considering one of the babies I used to look after and dote over turned 18 last month.  That's years as well.

Friday 31 August 2012

Foto Friday

I love ordering things off the internet.  It gives me something to look forward to when they arrive.  Some time ago now I order small, slower shaped fondant cutters.  I was going to use them on my RSPCA cupcakes but they did not arrive in time.  On Wednesday I received a package in the mail from China.  The customs information tag noted that the contents was a car charger.  Of course when I opened it up I found my fondant cutters.  I bet the x-ray guys at customs had a good laugh at that one.

Sometimes when I order things I get them sent to me at work.  It means that I have something to look forward to at work and don't have to rely on someone being at home to sign for the package if need be.  Today I got some gems I ordered from Earth's Gems.  They are a store on Face book and have some lovely things. 

Being that this is Foto Friday, I have taken some photo's of them for you to see.  I am also still in love with Pixlr-o-Matic as well so I played around with the images a little.

This gorgeous angel is made from Opalite.  He is 5cm x 3cm.  I love these angels.  I have a smaller one in blue goldstone that I need to photograph but it needs to be in the right ligt to show off it's sparkles.  I was also given an opalite stone and a blue howlite stone for free.  The blue howlite is very nice.


This angel and point are amethyst.  I am not sure what the specific use of the pendulum is for.  I bought it to make a necklace out of the charm.

I also bought 3 blue tiger eye stones.  Tiger eye has always been one of my favourite but I never new it came in blue and red colours.  The blue is a little too dark to be photographing in the light that I have at the moment so I will try and do it later.

On a yummy note, we were given a thank you gift in the office today.  Teeny tiny cup cakes came in the post.  I had a purple one (of course - purple fan here). 


I have had more deliveries this week but all my photos are else where.  I will post them on here tonight if I have time.

In the meantime, have a great Friday.  The weekend is almost here!

Tuesday 28 August 2012

Totally Tessa Tuesday

Now I lay me down to sleep,
I pray the Lord my soul to keep
And slowly up my dog she creeps
Until her nose in on my cheek.

I'm praying here I say to her,
But these words will not deter.
And if I die before I wake
A wet tongue slides across my face.

She stares at me with big brown eyes
and exhales little puppy sighs
I try to ignore this interruption
But she insists on more corruption

I am sorry Lord I can not pray
This little monster wants to play
But later when she is asleep
I pray the Lord our souls to keep
Amen

I didn't have time yesterday to post what I have been making so I will do it now.  It was a busy weekend and we had a black out on Saturday night.  Our oven decided not to work on Sunday and I had been creating things out of polymer clay that needed baking.  I ended up over at the neighbours house asking if I could bake two dragons and a butterfly in her oven. 

It seems I got the timing slightly wrong and the dragons are a little overcooked.  It looks like they were in a fire fight and haven't cleaned up yet.


Later on in the evening I decided to try our oven on a whim.  It finally decided that the blackout was over and it could be useful again.  I then sat down and made another blue dragon and cooked him for half the time as the others.  He looks much better.


I am going to make these into necklaces.  I have also ordered some pointed gem pendants and I will wrap a dragon around them.

Thursday 23 August 2012

Wacky Wednesday

Yes I know, it's Thursday.  That is why it is wacky.  Also because I was doing this last night, which technically was Wednesday.  :)

Have you ever used Paverpol before? In short it is a fabric hardener.  It can be used to make artwork for outdoors, indoors and may other things.  I am just learning how to use it myself.  I am currently trying to stiffen fabric petals to make a 3D flower that a FIMO teddy bear will be sleeping on.  Definitely Wacky Wednesday!

My friend at work is having her first baby (a little girl).  She is also a little closer than just a work friend as well as we often do craft days together.  Instead of the traditional maternity leave card (boring) I decided to do something special and different. 

I found a large frame going really cheap at Thingz (wish I got two now).  The matt board that was included is big enough for all of us at work to sign.  This was signed last week, and I somehow have to get it back home again with her knowing.  We catch the same train at night and this thing is big.

So, the matt board is signed, and where the picture would go is now being transformed into a paverpol floral delight.  At least I hope it is.  I have made a teddy bear out of FIMO and he will be laid on top of a flower as if he is sleeping on it.  I am very proud of my FIMO bear.  I shaped him first using tin foil and then covered him with a thin layer of FIMO.  That way he wasn't too thick for baking and his ears wouldn't burn off before the rest of him was sufficiently cooked.  I will take photos once I have finished the whole picture.

Speaking of pictures and FIMO.  I had a little bit of brown FIMO left over.  After having so much fun making fondant dogs, I decided to see if I could make a Fimo one out of the small amount I had left.  He is so cute and currently looking up at me from my desk.  He is 1cm wide and about 1.5cm high.  Think I might make a few more and see if they sell in my Etsy store as charms.

Monday 20 August 2012

What I've Made Monday

I have been very productive this last week making things for my friends new baby that is due soon as well as preparing for the RSPCA Cup Cake Day - today.

Perth main train station was shut down over the weekend due to renovations and track maintenance so it was going to be interesting getting to work with my cup cakes.  Thankfully my line was running well and there weren't the usual crowds.

I made red velvet cupcakes with cream cheese frosting.  I was going to make it from scratch but then I noticed that White Wings had bought it out in packet form.  OMG it is delish.  They turned out so moist and the icing is to die for. 

The fact that I was no longer making from scratch left me more time to play around with some fondant I had bought.  I decided I would make 3D dogs and put them on top of the cup cake.  I started the process on Friday night.  I made 6 on Friday, another 6 on Saturday (and a little experimentation) and then the rest on Sunday.  I had a blast. 

At first they did not sell because no-one wanted to eat the dogs (and because we charged $4).  Finally they seemed to disappear and we were left with about 6 of them which disappeared this afternoon.   Some have kept their little dogs and have them sitting on their computer (on a tissue I hope).  I believe some even have names now.  Lucky is one of them, I think it was because he was lucky he wasn't eaten.

Next year I have orders to make them in clay so people can buy them and not worry about sticky mess on the computer.

There were three main styles that I did: a standard looking pooch in a sitting position; a few laying down covering their eyes so that they couldn't see when you bit into them; and 2 boxers.  The ears of the boxers were hard, hence the reason why there are only two.  All together there were around 25-26 cup cakes an dogs.


Theses yummy  cup cakes were made by Mel and dog face ones by Corinne.  We also had a chocolate mudcake.  I don't know how much we raised yet.  I will find out tomorrow.